How to Replace a Kitchen Faucet: Step-by-Step Guide
Learn how to replace a kitchen faucet like a pro. Follow our step-by-step guide for Milwaukee homeowners to tackle leaks, upgrades, and more.

Few things disrupt a household faster than a dripping, loose, or completely broken kitchen fixture. When a daily-use hub like your sink starts failing, it drains your patience just as fast as it wastes water. Homeowners throughout the area frequently encounter stubborn mineral scaling, sudden leaks under the basin, and handles that snap right off mid-use. Knowing how to replace a kitchen faucet is an essential skill that saves you from costly emergency dispatch fees and water damage. In the unique climate of Milwaukee, where aging municipal infrastructure and seasonal ground shifts strain home plumbing systems, addressing fixture failure quickly prevents minor dampness from turning into major subfloor rot.
What Is Kitchen Faucet Replacement? Decoding the Mechanism
Replacing a kitchen faucet involves removing an old, worn delivery assembly and installing a modern unit that connects your home’s hot and cold water supply lines to a centralized spout and mixing valve. Standard systems rely on either compression cartridges, ceramic disc cylinders, or ball valves to regulate water temperature and volume.
When these internal mechanisms degrade, O-rings flatten, or mineral deposits score the ceramic seals, you experience persistent leaks, low pressure, or total handle lockup. Consider a typical historic home in Milwaukee's Bay View neighborhood: decades of high mineral content from Lake Michigan water can fuse old brass mounting nuts underneath the sink into a solid, corroded mass. What should be a thirty-minute swap turns into a mechanical challenge requiring specialized basin wrenches and penetrating oil.
Root Causes: Why This Problem Occurs in Milwaukee Homes
Plumbing fixtures in the Midwest face unique environmental and structural stressors that accelerate wear and tear far beyond national averages.
-
Hard Water Scaling: High levels of calcium and magnesium in local water supplies create dense scale deposits inside aerators, cartridges, and valve bodies, restricting flow and damaging seals.
-
Aging Housing Infrastructure: Many homes feature older supply lines, corroded shut-off valves, and cramped under-sink configurations that complicate modern fixture integrations.
-
Water Pressure Fluctuations: Municipal pressure shifts and thermal expansion inside closed water heating loops stress internal cartridges, leading to premature O-ring blowouts.
-
Thermal Stress: Rapid temperature shifts between freezing winter incoming water and indoor ambient temperatures cause metal components to expand and contract repeatedly, loosening connections.
-
Daily Mechanical Fatigue: Kitchen sinks are the most heavily utilized plumbing fixtures in any home, meaning handles, spray hoses, and pull-down docking mechanisms simply wear out over years of high-frequency use.
Critical Warning Signs: When Your Home is Sounding the Alarm
Fixtures rarely fail without giving subtle warnings before a catastrophic leak occurs. Ignoring these signs can lead to structural water damage inside your kitchen cabinets.
-
Auditory Clues: Persistent squeaking when turning the handle, water hammering when the valve shuts off, or a faint hissing sound indicating a slow internal bypass.
-
Visual Indicators: Unexplained puddles or damp wood inside the base cabinet, greenish-white mineral crust building up around the base plate, or a stubborn drip that won't stop when the handle is fully closed.
-
Tactile Changes: A handle that feels loose, wobbles on its base mounting, requires excessive force to turn, or fails to maintain a consistent water temperature mix.
Failing to address these indicators risks warped cabinet flooring, mold acceleration in dark under-sink spaces, and sudden supply line ruptures while you are away from home.
Professional Diagnostic & Repair Workflow
When a homeowner decides to call in licensed professionals for a complex fixture upgrade or an integrated sink overhaul, a systematic process ensures code compliance and zero leaks.
-
Step 1: Non-Invasive Triage & Safety Isolation: Technicians locate and shut off the dedicated hot and cold water supply valves under the sink, relieving residual pressure before opening any connections.
-
Step 2: Precision Diagnostic Assessment: Inspecting the condition of the existing angle stops, supply lines, and countertop mounting deck to check for structural rot or rust.
-
Step 3: Transparent, Upfront Options: Presenting clear, flat-rate pricing for labor and parts, discussing whether a standard swap or a complete sink reconfiguration is optimal.
-
Step 4: Code-Compliant Remediation & Installation: Safely removing the old unit, cleaning the mounting surface, securing the new deck plate, and connecting flexible braided supply lines with proper torque.
-
Step 5: Pressure Testing & Flow Verification: Opening the main water supply, testing for leaks under full system pressure, flushing out installation debris, and checking aerator flow rates.
Advanced Diagnostics: The Professional Tool Arsenal
While basic hand tools handle straightforward swaps, professional plumbers utilize specialized gear to tackle complications hidden beneath custom countertops and tight cabinetry.
-
Basin Wrenches: Telescopic, pivoting-head tools designed to reach high-torque mounting nuts tucked deep behind the sink basin.
-
Electronic Pressure Manometers: Digital gauges used to check static water pressure and identify whether a pressure-reducing valve (PRV) needs adjustment to protect new cartridges.
-
Thermal Imaging Cameras: Non-invasive infrared tools that detect hidden moisture pockets or slow pinhole leaks inside cabinet walls before mold takes root.
-
Pipe Freeze Kits: Specialized equipment that temporarily freezes water lines when aging shut-off valves fail to close completely, allowing safe replacement without shutting off the main house water.
DIY Reality Check: What You Can Safely Fix vs. When to Step Back
Tackling home improvement projects is rewarding, but plumbing involves water under pressure that can cause thousands of dollars in property damage if mishandled.
-
Safe DIY Tasks: Replacing a screw-on aerator, tightening a loose handle screw, swapping out a standard drop-in soap dispenser, or installing a simple flexible supply line.
-
The Danger Zone: Snapping rusted supply lines off inside older galvanized wall fittings, dealing with seized garbage disposal connections, or working on non-standard custom stone countertop mounts.
-
When to Call a Pro: If your under-sink shut-off valves spin freely without stopping the water flow, if the mounting nuts are fused solid with corrosion, or if you notice electrical wiring or outlets compromised by moisture beneath the sink.
Financial Breakdown: Cost Factors & Investment Realities
Understanding the financial variables of a kitchen upgrade helps you budget accurately for labor, parts, and potential complications.
-
Service Call & Dispatch Fees: Standard diagnostic or travel fees to assess the work area and confirm parts compatibility.
-
Fixture Quality & Material Tier: Basic builder-grade models versus commercial-grade, touchless, or smart-technology faucets with integrated pull-down sprayers.
-
Access Challenges: Additional labor required when working inside cramped, custom-built cabinetry or removing integrated water filtration systems tied into the current line.
-
Associated Component Replacements: The potential necessity of replacing worn-out angle stops, supply lines, or damaged sink deck plates that no longer seal properly.
Unique Expert Insights: Hard Truths Homeowners Learn Too Late
Years of field experience reveal several common mistakes that property owners make when attempting quick plumbing fixes without professional guidance.
-
Temporary Patch Kits: Wrapping leaking threaded joints with excessive duct tape or standard thread seal tape without addressing worn-out internal rubber seals only masks the issue until a major blowout occurs.
-
Chemical Exposure: Pouring harsh liquid chemical drain cleaners near delicate faucet connections or disposal units can degrade rubber gaskets and eat through metal finishes from the inside out.
-
Ignoring the Shut-Offs: Forcing an old, corroded multi-turn shut-off valve can snap the internal stem, turning a simple faucet upgrade into an emergency main-line water shut-off situation.
-
Overtightening Fittings: Cranking down plastic or brass mounting nuts with excessive leverage can warp the sink basin, crack porcelain, or strip delicate compression threads.
Comprehensive Home Plumbing Maintenance Framework
Keeping your entire kitchen and bathroom plumbing infrastructure running smoothly requires seasonal attention and smart daily habits.
-
Spring Maintenance: Inspect under-sink areas for any signs of winter condensation, test garbage disposal blades, and check sink strainers for wear.
-
Summer Care: Clean mineral scale off faucet aerators by soaking them in a vinegar solution to maintain optimal water pressure and stream direction.
-
Fall Preparation: Verify that your under-sink cabinet doors stay slightly open during extreme sub-zero weather snaps to let ambient kitchen heat circulate around vulnerable supply pipes.
-
Winter Checks: Monitor hot water recovery rates and check all shut-off valves for smooth operation.
-
Year-Round Habits: Avoid pouring grease, coffee grounds, or fibrous food waste down the kitchen sink drain, and never force a handle past its natural stopping point.
Emergency Protocol: When Immediate Dispatch is Non-Negotiable
While a dripping faucet is an inconvenience, certain plumbing failures require immediate professional intervention to protect your property.
-
Catastrophic Supply Line Rupture: If a supply hose completely detaches and water sprays uncontrollably inside your cabinetry, immediately locate and turn off the main water shut-off valve to the house.
-
Unresponsive Shut-Offs: When an under-sink valve breaks or leaks heavily upon closing, professional extraction tools are required to stop the flow safely.
-
Electrical Hazards: If water leaks from the faucet assembly directly into under-sink electrical outlets powering a dishwasher or disposal, shut off the circuit breaker immediately and call an expert.
Frequently Asked Questions (FAQs)
Can I replace a kitchen faucet myself without prior plumbing experience?
Yes, if your existing shut-off valves work properly and the mounting hardware isn't severely corroded, a standard single-hole or widespread faucet can be installed using basic hand tools within a couple of hours.
How long does a standard kitchen faucet replacement take?
A professional plumber typically completes a standard swap in one to two hours. A DIY project can take anywhere from two to four hours depending on unexpected corrosion or cramped working spaces.
What tools do I need to replace a kitchen faucet?
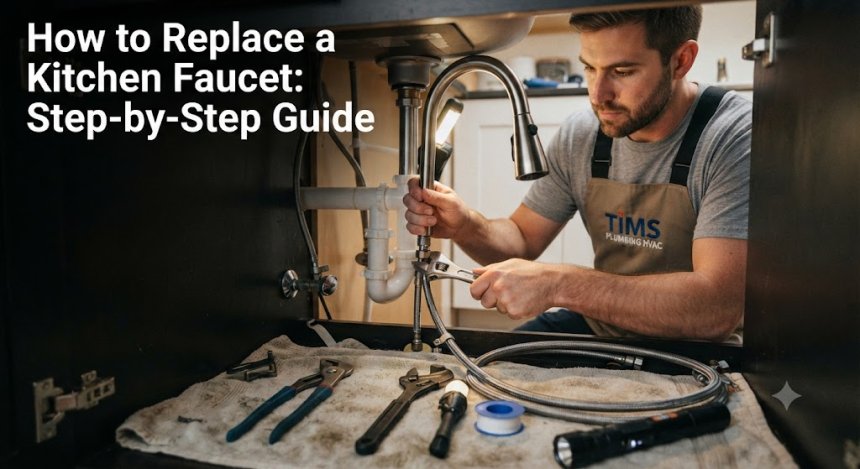
Essential tools include an adjustable wrench, a basin wrench for hard-to-reach under-sink nuts, flashlight, channel-lock pliers, clean rags, plumber's tape (PTFE), and safety glasses.
Should I replace my supply lines when installing a new faucet?
Always replace old flexible supply lines with new braided stainless steel lines during a faucet installation to prevent aging rubber from bursting under pressure.
How do I fix a seized mounting nut under an old sink?
Applying a penetrating oil like WD-40 Specialist to rusted threads and letting it sit for fifteen minutes often loosens stubborn nuts. In extreme cases, a professional may use a specialized nut-splitter.
Are touchless kitchen faucets worth the investment?
Touchless and motion-activated faucets offer excellent convenience and hygiene, though they require battery replacements or AC power adapters and have slightly more complex electronic components.
What causes low water pressure after installing a new faucet?
Debris, solder bits, or mineral scale often get pushed into the faucet's internal cartridge or aerator during installation. Unscrewing and cleaning the aerator screen usually resolves the issue.
Do I need to turn off the main water supply for a faucet swap?
If your under-sink hot and cold shut-off valves are functioning correctly and turn completely off, you do not need to shut off the main house water supply.