How to Replace a Toilet Flapper Yourself | Tims Plumbing HVAC
Learn how to replace a toilet flapper yourself with our expert guide. Save on water bills and stop running toilets fast in Milwaukee, WI.
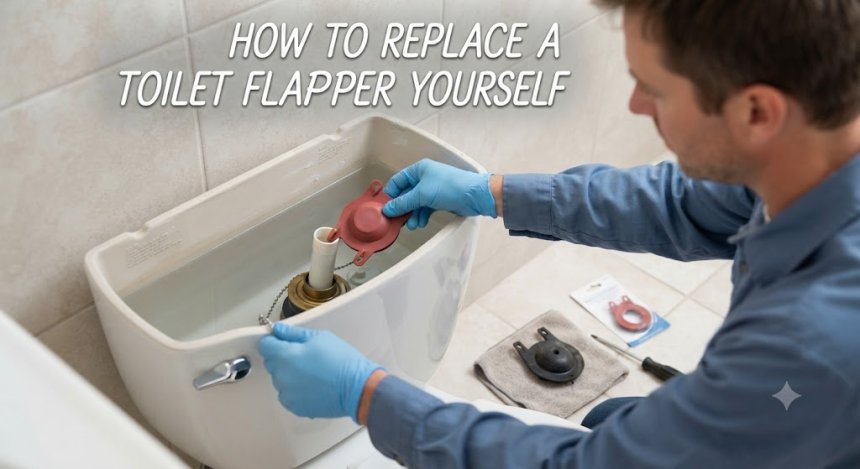
How to Replace a Toilet Flapper Yourself: A Step-by-Step Milwaukee Homeowner's Guide
Every homeowner in Milwaukee, WI, from historic homes along the East Side to modern builds in the Third Ward, eventually hears the dreaded sound of a toilet continuously running in the middle of the night. If your water bill has unexpectedly spiked or you find yourself jiggling the toilet handle just to make the running water stop, you are likely dealing with a faulty flapper. How to replace a toilet flapper is one of the most empowering DIY plumbing skills you can master, saving you the cost of a service call for a minor mechanical failure. At Tims Plumbing HVAC, we believe in helping local residents handle straightforward maintenance safely while knowing exactly when to call a licensed professional for deeper issues.
What Is a Toilet Flapper and Why Do They Fail?
The toilet flapper is a rubber or silicone seal located at the bottom of the toilet tank that lifts when you push the flush handle, allowing water to rush into the bowl. Over time, constant exposure to municipal water treatments, mineral deposits from hard water common in Southeastern Wisconsin, and natural rubber degradation cause the flapper to warp, stiffen, or crack.
Common symptoms of a failing flapper include:
-
The toilet running intermittently without anyone flushing.
-
A soft, mushy, or sticky rubber texture when touched.
-
Discolored water or mineral buildup coating the tank mechanism.
-
The need to hold down the flush handle completely for a proper flush.
Signs You Should Never Ignore a Running Toilet
Ignoring a faulty toilet flapper might seem harmless, but a continuously running toilet can waste up to 200 gallons of water per day, drastically inflating your municipal utility bills.
-
High Water Bills: An unexplained jump in your water bill is often the first indicator of a silent flapper leak.
-
Phantom Flushes: Hearing your toilet kick on by itself every few minutes means water is slowly leaking from the tank into the bowl.
-
Component Corrosion: Constant water movement inside the tank accelerates wear on the fill valve, chain, and flush valve seat.
-
Sewer Gas Odors: In rare cases, a completely dry trap or damaged bowl seal tied to water level fluctuations can let sewer gases escape into your bathroom.
Step-by-Step Guide: How to Replace a Toilet Flapper Yourself
Replacing a toilet flapper takes about 10 to 15 minutes and requires no special tools. Follow these practical steps to get your bathroom back in order.
-
Step 1: Shut Off the Water Supply: Locate the shut-off valve behind the toilet and turn it clockwise until fully closed. Flush the toilet to drain most of the water out of the tank.
-
Step 2: Remove the Old Flapper: Unhook the chain from the toilet flush lever arm. Disengage the flapper ears from the pegs on either side of the overflow tube and pull the old flapper out of the tank.
-
Step 3: Clean the Flush Valve Seat: Wipe down the rim of the flush valve opening where the flapper rests. Mineral buildup or slime can prevent a new flapper from creating a watertight seal.
-
Step 4: Install the New Flapper: Snap the new flapper's arms onto the overflow tube pegs. Hook the chain onto the flush lever, making sure there is about a half-inch of slack so the flapper sits completely flat.
-
Step 5: Test Your Work: Turn the water supply back on, let the tank fill, and flush the toilet. Watch to ensure the flapper seals tightly and the tank stops running once filled.
Can You Fix It Yourself or Do You Need a Plumber?
Replacing a flapper is a safe, easy DIY project for almost any homeowner. However, you should evaluate when a simple fix turns into a job for a licensed plumber serving Milwaukee, Waukesha, and surrounding areas.
-
Safe DIY Scenarios: The flapper is warped, the chain is disconnected, or the fill valve is simply misadjusted.
-
When to Call a Professional: If the plastic flush valve itself is cracked, the tank-to-bowl bolts are leaking, or your toilet continues to run after installing a brand-new flapper (indicating a warped flush seat or incorrect water level).
Common Plumbing Problems Related to Toilet Leaks
A faulty toilet can sometimes mask or trigger broader plumbing complications throughout your home's system.
-
Worn Fill Valves: If your tank fails to fill or overflows continuously, the fill valve assembly may need replacement alongside the flapper.
-
Supply Line Leaks: Aging braided or flexible supply lines can develop micro-fractures when jostled during DIY repairs.
-
Subfloor Water Damage: Slow, unaddressed leaks around the base of the toilet or tank can rot bathroom subfloors and damage ceilings on lower levels.
Tools and Equipment Professional Plumbers Use
While a flapper replacement only requires your hands, professional plumbers utilize advanced diagnostic equipment when dealing with complex bathroom plumbing failures:
-
Pressure Testing Gauges: To check home water pressure and ensure high pressure isn't destroying flush mechanisms prematurely.
-
Leak Detection Cameras: To inspect hidden leaks behind bathroom walls or beneath slab foundations.
-
Precision Hand Tools: Specialized wrenches and kit components designed for delicate porcelain fixtures without cracking tanks.
How Long Does Toilet Repair Take?
-
Flapper Replacement: 10 to 15 minutes.
-
Flush Valve Replacement: 30 to 45 minutes.
-
Complete Toilet Replacement: 1 to 2 hours. Repair times vary depending on corrosion levels, rusted bolts, and the accessibility of shut-off valves.
Cost Factors for Toilet Repairs
-
Diagnostic Fees: Standard service call rates for professional dispatch.
-
Parts and Materials: Universal flappers cost between $5 and $15, while specialized canister seals may cost more.
-
Labor Rates: Local plumbing labor rates in Milwaukee, WI, vary based on emergency dispatch status and project complexity.
-
Secondary Damage: Repairing water-damaged subfloors if a leak went unnoticed for months.
Hidden Truths Homeowners Should Know
-
Small flapper leaks can waste thousands of gallons annually, turning a $10 fix into a triple-digit utility bill.
-
Over-tightening tank bolts during DIY flapper or valve swaps can easily crack porcelain, requiring a total toilet replacement.
-
Hard water in the Midwest leaves mineral crusts that prevent flappers from sealing properly within just a few years.
-
Ignoring a running toilet puts constant strain on your home's fill valve and municipal water meter.
15 Common Mistakes Homeowners Make
-
Mistake 1: Buying the wrong size or brand-specific flapper. Fix: Measure your flush valve opening or take the old flapper to the hardware store.
-
Mistake 2: Leaving the chain too tight. Fix: Ensure slight slack so the flapper seats completely.
-
Mistake 3: Forgetting to turn off the water before starting. Fix: Always close the wall valve first.
-
Mistake 4: Using chemical drop-in tablets. Fix: Avoid harsh chlorine tablets that degrade rubber flappers prematurely.
-
Mistake 5: Forcing rusted supply lines. Fix: Replace old valves carefully to avoid snapping supply pipes.
-
Mistake 6: Ignoring mineral buildup on the seat. Fix: Scrape away scale gently with a non-metallic pad.
-
Mistake 7: Overtightening tank nuts. Fix: Hand-tighten plus a quarter turn with a wrench.
-
Mistake 8: Delaying simple maintenance. Fix: Address running toilets immediately.
-
Mistake 9: Ignoring wobbling toilets. Fix: Secure floor bolts to prevent wax ring failure.
-
Mistake 10: Using temporary tape on cracks. Fix: Replace broken plastic parts.
-
Mistake 11: Forgetting to test multiple flushes. Fix: Verify proper sealing before walking away.
-
Mistake 12: Neglecting other bathroom fixtures. Fix: Check sink stoppers and shower drains simultaneously.
-
Mistake 13: Forcing mismatched universal parts. Fix: Use OEM-compatible components.
-
Mistake 14: Working in the dark. Fix: Use a portable work light for clear visibility.
-
Mistake 15: Hesitating to call a pro when stuck. Fix: Contact Tims Plumbing HVAC for expert help.
Essential Maintenance Tips for Your Toilets
-
Inspect your toilet tank internals twice a year for signs of rubber degradation or mineral scale.
-
Clean the flapper seating surface during routine bathroom cleaning sessions.
-
Avoid flushing disinfecting wipes, paper towels, or hygiene products, even if labeled flushable.
-
Monitor your water meter periodically when no water is running inside the house to catch silent leaks.
-
Schedule annual plumbing checkups with Tims Plumbing HVAC for your entire home system.
When Should You Call an Emergency Plumber?
-
Water is actively overflowing from the toilet bowl and will not stop via the shut-off valve.
-
A main supply line bursts or snaps off completely.
-
Sewage is backing up into multiple home drains.
-
You smell gas near water heaters or utility hookups.